Showing posts with label Development Ideas. Show all posts

Thursday, November 22, 2012

Prevent your website opening in Iframe

One of our client, don't want to load their website inside an iframe any other website. In this case PHP provide an excellent header option to prevent or deny iframe opening of your web pages. In case you are in static html we can use JavaScript to redirect a actual page as browser URL on top.


Google is example website for iframe blocking, you did not open Google website in iframe.

PHP code to prevent iframe loading on dynamic php pages.
<?php
// php header to prevent iframe loading of your web page
header("X-FRAME-OPTIONS: DENY");
?>

Example of prevent iframe loading in PHP pages

<?php
header("X-FRAME-OPTIONS: DENY");
?>
<!DOCTYPE html PUBLIC "-//W3C//DTD XHTML 1.0 Transitional//EN" "http://www.w3.org/TR/xhtml1/DTD/xhtml1-transitional.dtd">
<html xmlns="http://www.w3.org/1999/xhtml">
<head>
<meta http-equiv="Content-Type" content="text/html; charset=utf-8" />
<title>Iframe Blocker</title>
</head>
<body>

<h1>Welcome</h1>

</body>
</html>


JavaScript code to prevent loading iframe on Static HTML pages

<script type="text/javascript">

// Prevent iframe loading of your web page and redirect to iframe target.
if( (self.parent && !(self.parent===self))
    &&(self.parent.frames.length!=0)){
    self.parent.location=document.location
}
</script>
Example of prevent iframe loading in Static HTML pages

<!DOCTYPE html PUBLIC "-//W3C//DTD XHTML 1.0 Transitional//EN" "http://www.w3.org/TR/xhtml1/DTD/xhtml1-transitional.dtd">
<html xmlns="http://www.w3.org/1999/xhtml">
<head>
<meta http-equiv="Content-Type" content="text/html; charset=utf-8" />
<title>Iframe Blocker</title>

<script type="text/javascript">
if( (self.parent && !(self.parent===self))
    &&(self.parent.frames.length!=0)){
    self.parent.location=document.location
}
</script>

</head>
<body>
<h1>Welcome</h1>

</body>
</html>

Friday, September 28, 2012

PHP Currency Converter with Google Currency Converter API


Are you looking for a reliable PHP Currency Converter, here is Google give you a solution from their open Google Currency Converter API


How this API Works:


This PHP Currency Converter work with following URL call back.


Querying Converter API from PHP function as per following URL:


q=1USD=?INR

http://www.google.com/ig/calculator?q=1USD=?INR

Based on Google Currency Converter API, I build an PHP Function to get Currency values from the out put of http://www.google.com/ig/calculator?hl=en&q=1USD=?INR. as PHP Array
function google_currency_converter($amount,$to,$from="INR")
{
 $content = file_get_contents("http://www.google.com/ig/calculator?hl=en&q=$amount."."$from=?$to"); 
 // Remove Spaces on API Output
 $content = preg_replace('/[^A-Za-z0-9.]+/','',$content);
 // Match All Currency values 0-9 and .(decimal)
 preg_match_all('/([0-9.]+)/', $content, $m);
 
 // Convert values with 3 decimal points
 $currency[$from] = sprintf("%.3f",$m[0][0]);
 $currency[$to] = sprintf("%.3f",$m[0][1]);
 
 return $currency;
}


$c = google_currency_converter(2800,"USD");

echo "INR:".$c['INR'];
echo "<br />";
echo "USD:".$c['USD'];


Thursday, September 27, 2012

Get MIME type


If you looking for a solution to find the File Content-Type or MIME Type.
Detecting MIME Type of each file extension is necessary to build dynamic file processing in PHP

Example:

// In the following code image/png is MIME type which is assigned dynamically
header("Content-Type:image/png"); 


We can get MIME Type using the following simple php code


Here is the best solution to find the Exact MIME Type of the file using the following simple upload form.

<?php
session_start();

if(isset($_POST['upload']))
{
 $mime_type =  $_FILES['upload_file']['type'];
 $_SESSION['mime_type'][] = $mime_type;
}

?>
<!DOCTYPE html PUBLIC "-//W3C//DTD XHTML 1.0 Transitional//EN" "http://www.w3.org/TR/xhtml1/DTD/xhtml1-transitional.dtd">
<html xmlns="http://www.w3.org/1999/xhtml">
<head>
<meta http-equiv="Content-Type" content="text/html; charset=utf-8" />
<title>Upload and Resize Image</title>
<style type="text/css">
body,td,th {
 font-size: 14px;
 font-family: Verdana, Geneva, sans-serif;
}
body {
 margin-left: 10px;
 margin-right: 10px;
}
</style>
</head>
<body>

<form action="" method="post" enctype="multipart/form-data">
    <fieldset>
    <legend>Upload File in PHP</legend>
    
        <input name="upload_file" type="file" id="upload_file" />
        
        <input name="upload" type="submit" id="upload" value="Upload" />
        
    </fieldset>
</form>

<div style="padding:10px;">
Uploaded File MIME Type is : <br />
<pre>
<?php 
if(is_array(@$_SESSION['mime_type']))
foreach($_SESSION['mime_type'] as $type)
echo @$type."\n"; ?>
</pre>
</div>

</body>
</html>


Download This Script     Live Demo  

Saturday, September 22, 2012

Water mark in PHP


Processing with image in PHP, Adding watermark is very help full. Add Image Watermark with original image is also help to protect our images here is my solution to Add Water Mark in PHP


Prepare an transparent image with exact same size of the original image. Transparent PNG with Text by overlap original image to create a final watermark added image.

<?php
// Original Image Path
$image= "images/original_image.jpg";  

header("Content-type: image/jpeg");
header("Content-Disposition: inline; filename=$image");

switch (TRUE) {
case stristr($image,'jpg') :
$photoImage = ImageCreateFromJPEG("$image");
break;
case stristr($image,'gif') :
$photoImage = ImageCreateFromGIF("$image");
break;
case stristr($image,'png') :
$photoImage = ImageCreateFromPNG("$image");
break;
}

ImageAlphaBlending($photoImage, true); 

// Same Size PNG Watermark Image with Transparency
$logoImage = ImageCreateFromPNG("watermark_image.png"); 
$logoW = ImageSX($logoImage); 
$logoH = ImageSY($logoImage); 

// were you see the two 1's this is the offset from the top-left hand corner!
ImageCopy($photoImage, $logoImage, 1, 1, 0, 0, $logoW, $logoH); 

imagejpeg($photoImage);
// if you want to save add the following line
imagejpeg($photoImage,"images/final.jpg");

ImageDestroy($photoImage); 
ImageDestroy($logoImage); 

?>


Friday, September 21, 2012

Convert Text Area to Array PHP


Processing multiple records through Text Area, We may need to convert that text area values into array from every line of text in that TextArea. here is my solution to "Convert TextArea to Array"


<!DOCTYPE>
<html xmlns="http://www.w3.org/1999/xhtml">
<head>
<meta http-equiv="Content-Type" content="text/html; charset=utf-8" />
<title>Text Area to Array</title>
</head>
<body>

<?php
// Check Form Submission
if(isset($_POST['submit']))
{
 // Capture cities text into variable
 $text = ucwords($_POST['cities']);
 // Replace entry new line with Comma(,)
 $cities = preg_replace("~\s*[\r\n]+~", ', ', $text);
 // Explode by Comma(,) and trim if any white spaces with array_map
 $cities = array_map('trim',explode(",",$cities));
 // final output as array
 echo "<pre>";
 print_r($cities);
 echo "</pre>";
}


?>

<form action="" method="post">
  <h2>Convert Text Area to Array</h2>
  <p>Enter each city every line<br />
    <textarea name="cities" cols="50" rows="10" id="keywords"></textarea>
    <br />
    <br />
    
    <input name="submit" type="submit" value="Submit Cities" id="submit" />
  </p>
</form>
</body>
</html>


Download This Script     Live Demo    

Thursday, June 21, 2012

Create a Zip Archive File Using PHP


Today we are going to program, How to build a Zip Archive from the Entire Directory or Create Zip file from selected file from server. Here is the solution to Create Zip file with PHP

Following PHP Program you can build Zip file
1 . Zip Entire Directory
2.  Zip Selected Files


<?php

include_once("CreateZipFile.inc.php");
$createZipFile=new CreateZipFile;

$directoryToZip="./";
$outputDir="/";
$zipName="CreateZipFileWithPHP.zip";

define("ZIP_DIR",1); // Make it 0 to Archive selected file(s)

if(ZIP_DIR)
{
//Code toZip a directory and all its files/subdirectories
$createZipFile->zipDirectory($directoryToZip,$outputDir);
}else
{
 $fileToZip1="files/File1.txt";
 $fileToZip2="files/File2.txt";
 $createZipFile->addFile(file_get_contents($fileToZip1),$fileToZip1);
 $createZipFile->addFile(file_get_contents($fileToZip2),$fileToZip2);
 $createZipFile->addFile(file_get_contents($fileToZip3),$fileToZip3);
}

$fd=fopen($zipName, "wb");
$out=fwrite($fd,$createZipFile->getZippedfile());
fclose($fd);
$createZipFile->forceDownload($zipName);
@unlink($zipName);
?>


Download This Script     Download Script    

Saturday, June 9, 2012

Custom File upload control jQuery


Making Stylish HTML Form file input control in designing part of Web Layout was create browser compatibility issues and upload problems. Customizing Form Input Control using following jQuery technique.


jquery.fileControl.js

(function($) {
    
    $.fn.fileControl = function(options) {
                
        /* TODO: This should not override CSS. */
        var settings = {
            width : 250
        };
                
        if(options) {
            $.extend(settings, options);
        };
                        
        return this.each(function() {
            
            var self = this;
            var wrapper = $("<div>")
                            .css({
                                "width": settings.imagewidth + "px",
                                "height": settings.imageheight + "px",
                                "background": "url(" + settings.image + ") 0 0 no-repeat",
                                "background-position": "right",
                                "display": "inline",
                                "position": "absolute",
                                "overflow": "hidden"
                            });
                            
            var filename = $('<input class="file">')
                             .addClass($(self).attr("class"))
                             .css({
                                 "display": "inline",
                                 "width": settings.width + "px"
                             });

            $(self).before(filename);
            $(self).wrap(wrapper);

            $(self).css({
                        "position": "relative",
                        "height": settings.imageheight + "px",
                        "width": settings.width + "px",
                        "display": "inline",
                        "cursor": "pointer",
                        "opacity": "0.0"
                    });

            if ($.browser.mozilla) {
                if (/Win/.test(navigator.platform)) {
                    $(self).css("margin-left", "-142px");                    
                } else {
                    $(self).css("margin-left", "-168px");                    
                };
            } else {
                $(self).css("margin-left", settings.imagewidth - settings.width + "px");                
            };

            $(self).bind("change", function() {
                filename.val($(self).val());
            });
      
        });
        

    };
    
})(jQuer
fileControl 

FileControl.html
<!DOCTYPE html PUBLIC "-//W3C//DTD XHTML 1.0 Transitional//EN" "http://www.w3.org/TR/xhtml1/DTD/xhtml1-transitional.dtd">
<html xmlns="http://www.w3.org/1999/xhtml">
<head>
<meta http-equiv="Content-Type" content="text/html; charset=utf-8" />
<title>jQuery Custom File Upload Control - W3Lessons.com</title>

<script type="text/javascript" src="http://code.jquery.com/jquery-1.7.1.min.js"></script>
<script type="text/javascript" src="jquery.filecontrol.js"></script>

<script type="text/javascript">

$(document).ready(function(){

// Custom File Input Control
 $("input.attachment").fileControl({ 
 image: "browse_btn.png",
 imageheight : 39,
 imagewidth : 128,
 width : 175,
 height:40,
 marginleft:0
 });
 
 })


</script>
<style type="text/css">
body,td,th {
 color: #D3BCA7;
}
body {
 background-color: #333;
}

.attachment, .attach
{
 padding:10px;
 margin-bottom:5px;
}
</style>
</head>

<body>

<form method="post" enctype="multipart/form-data">
<input type="file" class="attachment" /><br />
<input type="submit" class="attach" value="Upload" />
</form>

</body>
</html>

Copy Button Image


Wednesday, March 28, 2012

Encode PHP files, How to encode php?


PHP Code is our asset of development and concepts. We need to protect / secure our PHP Source code on distribution server. In order to protect PHP source code we need to  encode php files before going to distribute. To encode PHP files to protect PHP source. Here is my solution to protect our PHP Source code with PHP encryption and get Encrypted PHP Source to deploy. In this task we have to use htmlspecialcharsgzdeflatebase64_encodehtml_entity_decodeeval functions


How to encode PHP files and PHP Encoder Online


SourceCode.php   
Put your PHP Source you need to Encode/Protect also include domain based verification code inside this.

<?php
// SAMPLE SOURCE CODE allowed to run only on w3lessons.com
// Start
// PHP Tag in begining and Ending is Must to process encoding...
if(!strstr($_SERVER['HTTP_HOST'],"w3lessons.com"))
die("Unlicenced Domain");
?>
<!DOCTYPE html PUBLIC "-//W3C//DTD XHTML 1.0 Transitional//EN" "http://www.w3.org/TR/xhtml1/DTD/xhtml1-transitional.dtd">
<html xmlns="http://www.w3.org/1999/xhtml">
<head>
<meta http-equiv="Content-Type" content="text/html; charset=utf-8" />
<title>How to Encode php files</title>
</head>

<body>
<?php
echo "<h1>Welcome</h1>";
?>
</body>
</html>
<?php
//End
?>

Encoder.php
Run Encoder.php (Output will create a New File EncodeOutput.php

<?php ob_start();

// Put your Source in this file SourceCode.php
$EncodeFileName = "SourceCode.php";
$EncodeCount = intval(rand(5,72)); // Adjust to improve your code security.

// It will cleated automatically after encoding....
copy($EncodeFileName,"EncodeOutput.php");

for($i=0;$i<=$EncodeCount;$i++)
{
 $phpcode = file_get_contents("EncodeOutput.php");
 //remove space
 $phpcode=trim($phpcode);
 //count string
 $count=strlen($phpcode);
 $last=$count-4;
 $rest = substr($phpcode, 2, $last);
 $display= substr($rest, 4);
 $string= htmlspecialchars($display,ENT_NOQUOTES,'UTF-8');
 $phpcode=stripslashes($phpcode);
 $compressed = gzdeflate($string, 5);
 $encode = base64_encode($compressed);

 $phpcode = "&lt;"."&#63;"."php \n";
 $phpcode .= 'eval(html_entity_decode(gzinflate(base64_decode("'.$encode.'")),ENT_NOQUOTES));';
 $phpcode .= "\n".'?'.'>';

 file_put_contents("EncodeOutput.php",html_entity_decode($phpcode,ENT_NOQUOTES));
 usleep(1000);
}

echo "Encoding Completed ! <br /><br />View <a href=\"EncodeOutput.php\">Encoded Output</a>";

?>


EncodeOutput.php
Backup your Original file and replace the encodeoutput.php content instead of Actual PHP Code


<?php 
eval(html_entity_decode(gzinflate(base64_decode("NVa3ruWGEuv9Ga52IQPKCYaLo5xzbhbKOesoff27zWunGJIAOZy/yjMdfjXHOPwpp6M9nj9Fmc9F+at+26ka0qP8laV7SWD/n/9tJC7Kbc4s9N5bxo+CN/mGOaftTN0Z+fpzbbsFoR1BZKXnpcA3ECIXqsbN7KzLI78WZtArsp00kJV7u407OI4AGrhcpoLAk5lH2UjgCdLH4oxANSqBOMvnwL3p7gerUjkv/l0gF28xEiensPA3wLUnqT+c4Svojbx3E8efTEI2JkJfLBdPNSxHn6fsQPGUipQAPCjOaPWsYq1lAYLp/GLW90X+gEuho+lIIRtikPqlpJ7LuvgOa7MbGKHro9mSi3C4OR4xOjX7fDCrvJ7dXcnrDUc5vC3p6j4HPH1YRTAe56IKX00Nj6Aui0f8qFdEO0T5U6gWDDo8+ciDyzYDZeXg0/Iqf4zeg9tJK0VH+t5vJUSCOGf6OvNkHhCgKa4GmbRqZw8WiYc2NGpm+PNgejggMeeX6sussGa7EyeE3PyN584xf1CT+KLwZkBzRvqK6rhF7EQQVL7TRB2xoOfy6/qjIIZUgcJADG77b+E/7+2DUNMFjQTMF8HxNTp4U4nTNiFfBPwlUB66yEAcQ1Ptpvmy52EL0JU5aHcgW8eIAihGVFPMhIpFAaSaIDXtCUV+Yv0bgvqiOZJhGq9pxI98J5IP29CeS0vsK9ulNQeteDUmqf43PgqARr+McyB8G+smUfvjdoa1ytB1LI0hTFJSDNbTZLyyMk4ZYW9kFcK1HowSLH8vHV61hJZAvyGbZPScaxcuQZFj7oluyZazZYcyyYxjg2VL3OASOUHhTezw++s6Ka0neSO1iJocc41fu7bJJVa7xBo3aXBdxyrGXXb0tsE13kKZDm4cfscT1UCNnHW/35vRna1YMYXiqoye3+dBmEmjTrmX1/voU98mnFJOjTwGRcdSMAgUYWjRQ6fOQVEMlrKHnlYFLxiu3kKqK7CMxqVJGL3guUaNNMgys/iuerFIGSbrJmwe9wDPITSYi3fJCPEsDyyhoEtBYL8gUX9DR/ON5w+iHjtbul80E3n9Xs7Tfg4PVzXPYoSBrGSfrz4N0ryj5vUUHWimL6sP7nE8pkWGenUw934z32nQhxyA2+IKSjeZ4DtzPaFzVYQPze2po7hWO0WirEIlm0sLdTftokJ/yG5S42nmuPh4OE76BHG7d2Gu8btM62JNkXXZGX1apjirJFElOQU85m3HxM7V0vGReVfmVik8gW8R9oI+zEbXR3Ov/RDve3GHkaIKIUu0fCGCGM4lFhbEHC125KpXKp7Mkj1HHrBktfYTsyYaUkaGBXTxCXDXSJerrZF3Mj/yDZVKSkdCP/SpNhohVJyRHXxBTq6q+MtNkh5CoSZiDSkCWHCSpLEy2cBnCxXbt2s1jUzAfSitAjoz5VVlcseQykOSTJMqqJuUpozg11z0JNu5dM1LQuwK5hYvOwqtQ7PRnvItv/HJu4KWuLKi4+QbWaQTykD0UbBnup63SQ/rHGz6QfvHB1Vu4q4WFZ5iaLMPPqw2rZbq6LQWzvghG/MP4LBEI8hYg4CVgs+G/1mRD56y/M8J5cpj8XJvf7dSAiBd9CC19tmqtHbFJ/n7ZikknGJhdOY1PN1gc0R8GKK0aeC+MgqOghAwteOIX6Yxz1HrQKATgsoARo+7eIyKsfruoi+1sE8wFCOBDsmDgFiLPXYESa03L+09L8crFNuf+MKC4XL4uPH2NRCMtYhNZ36iO2P9gth5oRincR6T1WB+WqBRQF1odG33qN21tQmr6xtUmruQ6bHZyaNEpFwqZXC8GYsSiGuqnZPEu3vymcm4UgaoqqX9NuS3lDjqoE8rOWxkidoji8nFaaKOQrTQb6p0m85X1Ozsx8PVfZHNUYAfPoi3/avG78aLRYRyd+g5R2LcH7lXgiPabn6iyYZyTx1KRbWRODHV3vFeIr/6MtUmVRzrqTPMTp8+UiJ+UKXILLouz91mr8MH8ix5ku5R0Gfg0S4mgxFvk9hZ1WG6kjZlYrtTOTb0wlhcs4duFe7IulSZB2d73uFOtD95Iq54wkMqZFzmo6ELK6dBiWzQ2L/nfM22mx9EYOMMKs8ZcTqtCAxGT3QYACytBc3VM+awnR1w3Trx7W9ipbgQhyPmypnXV+9n2FaB6+seLxaMW86sOFiQBTLAgOhmhoNB9ViTR+2IXGP4qUiXlEOip2upunq3xlmtOLuue6B4E08luwB+82FiHgl7CZ+IDgiqMobc6yJcoODZ1wVfAZc9pZcTGhbmsxro2ztHk6OfMHwoSpPuVymSoHFAiedI9L5ozgWsY+jj++L9WJRjsuT1TRA/ebyDep4tQwyKW/acsrh0SdFDfrYH60oPL/jbsbhWkPxrZT965FMDcNyEhLV1wi1AjAS7hQ+g8JXKAzBQOjHClMPDg6jlMPdhIWTwNyroff2JbiCSPn/qZ5sfMFkbb3Qdr1riTDhDuUfW+lEDVxKxxNi0e2CSxHtfTL0NJnBNS8weCFJYVmeYLvhNAXOBrK5rpg+hainRoikGnH2fOakve/f4yH3/81ogNJBiSb76UG/W0yEELR0+8NNPSXVrH4DjTp7VzCefb3hvaagTEWKanqKkAXUcVXOxrMhDLHIAA40T2ECKyTFRg/naz+KI4Cpwo0gPATe3lnDF9sjSw7ijmJn+NBHN9pRUe3i5HirtgJnOcEIRWNDnkKfmZFt9LCyR2xl8mi6pL/LBYyPrTVTd/GlQ0sHfktCbGdqSPg1msVuH6ZJdUeLWsyGQa7q2wjc9c7qONOtC9h5iph1FsxVXSm16IMKeqvykVcdjjD42GgiC1milnwgMtzhDZmkGwelFSRBgrv/++/v37394w/tjmPbPUt79/fvfv/4H")),ENT_NOQUOTES));
?>


Monday, March 5, 2012

Page Loading Time PHP


Execution of server side scripting need to optimize in order to get the Optimized page loading time. In this case most of the Server Side Response typically not more than 2 to 30 seconds. In this case we need to find the Exact page loading time in PHP using the following Script.


Find Page Loading Time PHP
<?php
function page_loading_time()
{
    list ($msec, $sec) = explode(' ', microtime());
    $microtime = (float)$msec + (float)$sec;
    return $microtime;
}

$start=page_loading_time();

usleep(100000);  // Delaying page output 0.1 second for testing purpose.

echo "<br />";
$end = page_loading_time();
// Print results.
echo 'Page Loading Time: <b>' . round($end - $start, 2) . '</b> seconds';   
?>

Friday, March 2, 2012

PHP Tidy - Clean HTML Tags, HTML code, HTML Source, Comments


Website Webpage Optimization part, HTML pages contain many unnecessary development usage section such as Comments, Indents, Empty Lines, Accidental Enclosed tags without End Tag, Unknown Closing Tag, These are very sensitive for Browser Compatibly Issues, Page Loading Time and Web Page Optimization


We can able to keep our Web pages keep away from Unnecessary things such Comments, Un closed Tags, Un closed End Tags using HTML Tidy Object from PHP.

Here is the Example Code for PHP tidy Object. with Examples.
With this Example We have to use tidy Object (Tidy Object need to Enabled in PHP Configuration).
Check with phpinfo() under Tidy. ob_get_clean() , parse HTML String with parseString() function from Tidy object, and Clean our HTML with cleanRepair()

Wednesday, February 8, 2012

Prevent Browser cache PHP

Working with PHP in some times we need to avoid browser cache, Browser cache will cases you to prevent page updates when ever we work on Self Data POST in PHP,

Here I give the solution to prevent the Browser cache when reloading current page. and re-download the actual page with dynamic content.
header( "Last-Modified: " . gmdate( "D, j M Y H:i:s" ) . " GMT" );
header( "Expires: " . gmdate( "D, j M Y H:i:s", time() ) . " GMT" );
header( "Cache-Control: no-store, no-cache, must-revalidate" ); // HTTP/1.1
header( "Cache-Control: post-check=0, pre-check=0", FALSE );
header( "Pragma: no-cache" ); // HTTP/1.0

Wednesday, January 18, 2012

PHP Sort array by key values based on another array

When you are working with array and data field sets, sorting array by key value is very usefull to reorder data set based on your requirement.

Here is a PHP function to Sort array by key values based on another array

Friday, August 26, 2011

Develop a Simple Anti spam Captcha in PHP with Custom Font


When working with web forms on web development.  Preventing spam is important process. But most of the developers are feel Captcha is very big process, nothing like that.
Here is the very simple Captcha developed in PHP with custom font rendering option. You can change the look and feel based on your project need.

Let us see how to create this Capcha in PHP:


Now I am going to generate a 4 Digit Random number and than store into session variable using ($_SESSION). Based on the 4 Digit Random number I will generate a simple capcha with the custom font feedbackbb.ttf.


Monday, August 15, 2011

Connect Multiple MySQL Database in PHP

If your website move on to a traffic worthy website. you need to work with multiple database for load balancing and overhead distribution. So we need to work with multiple database on single project. MySQL and PHP provide some efficient logic to handle multiple database on single project. Let us see how to work with Multiple database in efficient way.


Example Project working with Multiple Database.

include/connectdb.php

<?php
// Define Connection Details
define(DB_SERVER,"localhost");
define(DB_USER,"root");
define(DB_PASSWORD,"");

// Define Database Names and Table Names
define(DB_CUSTOMER,"w3lessons_customer_db");
define(DB_SERVICE,"w3lessons_service_db");

// Define Table Name prefix with database name
// For Customer Table
define(TBL_CUSTOMER,DB_CUSTOMER.".tbl_customers");
// For Service Table
define(TBL_SERVICE,DB_SERVICE.".tbl_services");

// Connect MySQL Server
$conn=mysql_connect(DB_SERVER,DB_USER,DB_PASSWORD);
?>

index.php

<?php
include("include/connectdb.php");

if(isset($_POST['customer_id']) and $_POST['customer_id']!="")
{
	$sql="select * from ".TBL_CUSTOMER." where customer_id='{$_POST['customer_id']}'";
	$result=mysql_query($sql);
	$row=mysql_fetch_array($result);

//	$customer_id=$row['customer_id'];
//	$email_id=$row['email_id'];
//	$service_id=$row['service_id'];
// Instead of above three lines we can use	
	extract($row);
}
?>
<!DOCTYPE html PUBLIC "-//W3C//DTD XHTML 1.0 Transitional//EN" "http://www.w3.org/TR/xhtml1/DTD/xhtml1-transitional.dtd">
<html xmlns="http://www.w3.org/1999/xhtml">

<head>
<meta http-equiv="Content-Type" content="text/html; charset=utf-8" />
<title>Working with Multiple Database :Service Update</title>
<style type="text/css">

<!--
body,td,th {
	font-family: Verdana, Geneva, sans-serif;
	font-size: 11px;
	color: #000;
	font-weight: bold;
}
body {
	margin-left: 10px;
	margin-top: 10px;
}
-->
</style></head>

<body>
<form action="<?=$_SERVER['PHP_SELF']?>" method="post" id="thisForm">

<table border="0" cellspacing="0" cellpadding="7" style="border:1px solid #999;">
  <tr>
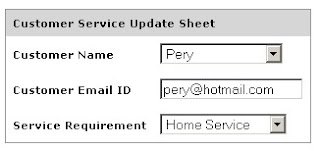
    <td colspan="2" bgcolor="#D6D6D6">Customer Service Update Sheet</td>

    </tr>
  <tr>
    <td>Customer Name</td>
    <td><select name="customer_id" id="customer_id" onchange="javascript:document.getElementById('thisForm').submit()">

      <option value="">Select Customer</option>
      <?php
	// Load Service Names from Customer DB
	$sql="select * from ".TBL_CUSTOMER;
	$result=mysql_query($sql);
	while($row=mysql_fetch_array($result))
	{
		if($row['customer_id']==$customer_id)
		echo '<option value="'.$row['customer_id'].'" selected="selected">'.$row['customer_name'].'</option>';
		else		
		echo '<option value="'.$row['customer_id'].'">'.$row['customer_name'].'</option>';
	}							  
	?>

    </select></td>
    </tr>
  <tr>
    <td>Customer Email ID</td>
    <td><input name="email_id" type="text" id="email_id" value="<?=@$email_id?>" /></td>

    </tr>
  <tr>
    <td>Service Requirement</td>
    <td>
      <select name="select" id="select">

        <?php
	// Load Service Names from Service DB
	$sql="select * from ".TBL_SERVICE;
	$result=mysql_query($sql);
	while($row=mysql_fetch_array($result))
	{
		if($row['service_id']==$service_id)
		echo '<option value="'.$row['service_id'].'" selected="selected">'.$row['service_name'].'</option>';
		else
		echo '<option value="'.$row['service_id'].'">'.$row['service_name'].'</option>';
	}							  
	?>

        </select>
    </td>
    </tr>
  </table>
<br />
<br />
<a href="http://www.w3lessons.com/">View Article for Working with Multiple Database</a>

</form>
</body>
</html>

Output:


Download This Script     Download Script

Sunday, August 14, 2011

Process Two Submit Buttons on single Form for different actions

Working with multiple submit form is very useful idea to perform multiple action in single form. For example we can use this structure for Trial and Full Version download, Save and Save Draft,

<?php
if(isset($_POST['download']))
{
	//Choose a File Based on Submit Button	
	if($_POST['download']=="Download Trail Version")
	$file="TrialVersion.exe";
	elseif($_POST['download']=="Download Full Version")
	$file="FullVersion.exe";

	header('Content-type: application/octet-stream');
	header("Content-length:".filesize($file));
	header('Content-Disposition: filename="'.basename($file).'"');		
	readfile($file,true);
	exit();
}
?>
<!DOCTYPE html>
<html>
<head>
<meta http-equiv="Content-Type" content="text/html; charset=utf-8" />
<title>Untitled Document</title>

</head>

<body>
<form id="form1" name="form1" method="post" action="<?=$_SERVER['PHP_SELF']?>">

<input type="submit" name="download" value="Download Trail Version" />
<input type="submit" name="download" value="Download Full Version" />

</form>
</body>
</html>

Saturday, August 13, 2011

Simple Trick to Find File Content Type in PHP

When processing file from server side we need a Exact document Content-Type header define required to process a content type properly.

From the following php header parameter have "Content-Type": audio/mpeg. The String "audio/mpeg" is the content type of the file which we need to process a proper format disposition from server to client.

header('Content-type: audio/mpeg');
Here is the Simple Trick to find the document Content-Type header string
<?php

if(isset($_POST['upload']))
{
	echo "<pre>";
	print_r($_FILES);
	echo "</pre>";
}

?>
<!DOCTYPE html>
<html>
<head>
<meta http-equiv="Content-Type" content="text/html; charset=utf-8" />

<title>Simple Trick to Find File Content Type in PHP</title>
</head>

<body>
<form id="form1" name="form1" method="post" action="<?=$_SERVER['PHP_SELF']?>" enctype="multipart/form-data">

<input name="filename" type="file" />
<input type="submit" name="upload" value="Check Content Type" />

</form>
</body>
</html>


Requirements for SEO Friendly Web Layout

No CSS hacks
The CSS used for this layout is 100% valid and hack free. To overcome Internet Explorer's broken box model, no horizontal padding or margins are used in conjunction with a width. Instead, this design uses percentage widths and clever relative positioning.

SEO friendly 2-1-3 column ordering
The higher up content is in your page code, the more important it is considered by search engine algorithms (see my article on link source ordering for more details on how this affects links). To make your website as optimised as possible, your main page content must come before the side columns. This layout does exactly that: The center page comes first, then the left column and finally the right column (see the nested div structure diagram for more info). The columns can also be configured to any other order if required.

Full length column background colours
In this layout the background colours of each column will always stretch to the length of the longest column. This feature was traditionally only available with table based layouts but now with a little CSS trickery we can do exactly the same with divs. Say goodbye to annoying short columns! You can read my article on equal height columns if you want to see how this is done.

No Images
This layout requires no images. Many CSS website designs need images to colour in the column backgrounds but that is not necessary with this design. Why waste bandwidth and precious HTTP requests when you can do everything in pure CSS and XHTML?

No JavaScript
JavaScript is not required. Some website layouts rely on JavaScript hacks to resize divs and force elements into place but you won't see any of that nonsense here. The JavaScript at the bottom of this page is just my Google Analytics tracking code, you can remove this when you use the layout.

Resizable text compatible
This layout is fully compatible with resizable text. Resizable text is important for web accessibility. People who are vision impaired can make the text larger so it's easier for them to read. It is becoming increasingly more important to make your website resizable text compatible because people are expecting higher levels of web accessibility. Apple have made resizing the text on a website simple with the pinch gesture on their multi-touch trackpad. Is your website text-resizing compatible?

No Quirks Mode
This liquid layout does not require the XML declaration for it to display correctly in older versions of Internet Explorer. This version works without it and is thus never in quirks mode.

No IE Conditional Comments
Only one stylesheet is used with this layout This means that IE conditional comments are not needed to set extra CSS rules for older versions of Internet Explorer.

Friday, August 12, 2011

Web Interface Design and Target Audience

When designing a web interface. get the clear idea about target audience taste and what their like and dislikes and what they are looking for on web. and consider the following ideas.

Placement and Position
The first thing you do when you design a Web page is you start with a blank page and you place elements on that page. Placement of your elements can be critical to whether your design works or is a dismal failure.

Do not use Ancient Table Layout
It's time to break your old habits and admit that using tables for layout is outmoded and lazy. Table Layout make your html size nominally high. and  It's time to move on to CSS layouts, as your excuses just won't hold water for much longer, and why keep bailing when you could join the rest of us at the helm!

CSS Layouts are More fast than Table Layout
Learn why you should use CSS to position your pages rather than HTML tables. as a result CSS Layouts are render quickly when consider the table layout.

Parts of a Web Page
The parts of a Web page can be broken down into five distinct elements: images, headlines, body content, navigation, and credits. Most Web pages will include all five of these items, but do you know what they all are?

Web Grids - Columnar Layout in Web Grids
Work your layout with grid system, you often have more control over the horizontal sizes than you do about the vertical. So grid layouts become columnar layouts. This gallery shows how grids can create dynamic layouts with various numbers of columns.

Why Use a Grid to Design Your Page?
Grids are an important part of layout in Web pages. They are a great way to impose order on your Web pages and provide balance to your layouts.

Prioritize Your Content and Put Important Stuff First Using CSS Float…
Learn how to use CSS floats to lay out your Web pages in any fashion you like, without changing the HTML. Putting the most important content first in the HTML gives robots and search engines a leg up in knowing what content is important.

4 Imporant steps to plan your website development Process

Before starting your Web development process, you need to consider the following real time tactics for your web development.

As a Web developer or Web designer or CSS developer, what ever the position you are in your job. you need consider the following procedure to make your development process more effective and make you as a Team Player.

Let me tell few point about Real time development process. We are going to view each points more elaborate way in future articles.


1. Web Interface Design based on Target people
Collect target website visitors data like Web layout color scheme, screen elements and screen resolution base, Browser, Operating System they are used. these data are bring a idea to know about your target audience like and dislike. Make your interface more targeted is very important to reach your target online audience .


2. Choose HTML5 as your Document Type
In future HTML5 creates a revolution because of this portability and flexibility. HTML5 is best for Platform independent web interface document type. HTML 5 have very effective semantic content tags to classify your content in user interface.  <header>, <nav>, <article>, <section>,<aside>,<video> these are some content specific tags to present user and Search Engines with value added way.

3. Design you Layout Consider the SEO Part
When designing a web interface layout HTML elements and tag usage is very important factor for Search Engine Optimization. Designing interface includes with Text Content, Graphics Videos Side Boxes. Each design segment need to use corresponding HTML tags based on segmentation. for example your need to put a piece of text information. Use a <p> tag for this. If you going to place a Image use <img> tag for this.

4. SEO Friendly Development! IMPORTANT
SEO: The Industry of Search Engine Optimization is raised ! the reason behind that is "The Web Developers". Developers are not consider any SEO aspect at the time of development. they are just integrate what the designers provide to them. In this process the project create more complexity  in future to reach project goal.
Current scenario is SEO is very important. So Development process also need to consider the SE Part to reduce the project cost and target duration to reach the project goal.


Conclusion:

Consider the above points and Let we view these steps in more elaborate way in upcoming articles.